With the end in sight I ramped up the baking yet again and
completed five bakes (three new and two previously baked) this week, a personal
best for me. Now I won’t write them all out in full on this post because we
will be here for days but I will show you where to find them.
Knowing that I was going to be super busy making Christmas
dinner for eight people this year, my lovely colleague Louise shared her super
easy family recipe for the Christmas Chocolate Cake House. She gave me a copy
of the recipe which was cut out from a magazine many years ago and has been
made by someone in Louise’s family every year for the last 26 years! I knew it
was going to be a reliable choice for Christmas day but I also wanted to try to
make the traditional version of the Clootie Dumpling I mentioned in week 48 to
finish off our Christmas feast.
After the excitement and gluttony of Christmas was over I had
a day off with my feet up then got back in the kitchen to make a Free Cakes for
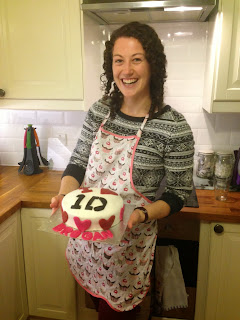
Kids cake, (with the help of my friend and colleague Nuala), for a lovely 13
year old girl named Brogan. Then I couldn’t resist using my two baking related Christmas
presents before the end of the challenge (cupcake cases and a cookbook stand) so I made festive Cranberry and Orange
muffins and rounded off the year with some Red Velvet Whoopie Pies. Phew...it
has been a bakingtastic week but I have LOVED it.
Christmas Chocolate Cake House
 | |
|
 |
| Carving instructions for the house! |
Ingredients
Cake
·
4 level tbsp cocoa mixed with 4 tbsp of boiling
water – leave to cool
·
225g Stork Margarine (at room temperature)
·
225g caster sugar
·
4 eggs
·
225g self-raising flour – sieved
Chocolate icing
·
3 level tbsp cocoa mixed with 3 tbsp of boiling
water – leave to cool
·
150g butter (at room temperature)
·
350g icing sugar – sieved
·
A little milk if necessary
Decoration
·
125g marzipan (We
don’t like marzipan so I used fondant roll icing
instead)
·
2 packs of chocolate finger biscuits
·
Cotton wool (optional)
·
Icing sugar to dust
Method
- Preheat oven to 180° C. Grease and line a 7inch deep square tin.
- Place all the cake ingredients together in a mixing bowl and beat with a wooden spoon until well-mixed (3-4 minutes).
- Place the mixture in the prepared tin and bake for 50 -60 minutes.
- Turn out the cake and cool on a wire rack.
- To make the icing place all the icing ingredients in a bowl and beat until smooth, add a little milk if icing is too stiff.
- To shape the Christmas house – trim the top of the cake to make it level. Cut a section of the cake, measuring one third to make the roof – see photo above.
- Split the base and sandwich it with the icing. Spread the top and sides of the cake with icing and place the roof sections in position.
- Cover the outside of the house in icing. Form the roof with the chocolate fingers side by side. Roll out the marzipan (or fondant) and cut shapes for the doors, windows etc. Use some of the fondant or left over cake trimmings to make a chimney.
- You can use some icing to make a path, add some cotton wool to the chimney and put some Christmas trees outside if you like (we didn’t do this as you can see). Finally dust with icing sugar to look like snow (we forgot to do this, oops).
Clootie Dumpling
See photo of ingredients and instructions below. You will
need a large square linen or cotton clootie (cloth) and a large pot.
 |
| Instructions on the clootie which came from my Gran! |
 |
| The dumpling is HUGE!! |
 |
| Dumpling toasting under the grill to finish it off. |
Cranberry and Orange
muffins
 |
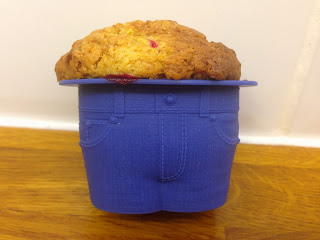
| The good kind of muffin top!!! Thanks for the muffin cases Tori. |
Ingredients
(measurements are in American cups)
·
2 cups. all-purpose flour
·
3/4 c. Sugar
·
1 tsp baking powder
·
1/2 tsp baking soda
·
1/2 tsp salt
·
1 c. Cranberries
·
1 large egg
·
1/4 tsp orange extract (I
didn’t have this so just used the zest of an orange instead)
·
3/4 c. orange juice
·
1/4 c. vegetable oil
Method
- Preheat oven at 400° F/200° C.
- In a large bowl, combine all dry ingredients together.
- Stir in the cranberries.
- In a small bowl or measuring cup, mix well together the egg, orange extract, orange juice and oil.
- Add the orange mixture to the dry ingredients and stir just until moistened. Do NOT over stir your mixture because you will end up with tough muffins!
- Spoon into muffin cups (I used my AMAZING muffin top jeans cups given to me by sister-in-law for Christmas!!!) or into greased muffin sheet.
- Put in the heated oven and bake for 15 minutes, or until a toothpick inserted in the middle of your muffins comes out clean.
Red Velvet Whoopie Pies from Cake Days, The Hummingbird Bakery Cookbook
 |
| Red ish Red Velvet |
 |
| My new cookbook stand, nice huh! |
 |
| Ben with his happy cake face. |
Ingredients – for the pies
- 120g unsalted butter – softened
- 200g soft dark brown sugar
- 1 large egg (this definitely needs to be a large one because the batter gets very stiff)
- 120ml buttermilk
- 1 tsp vanilla essence
- 340g plain flour
- 2 tbsp cocoa powder
- ½ tsp bicarbonate of soda
- ¼ tsp salt
- 30ml red food colouring (I probably used far more than this to actually make it go red because it took ages to change colour!)
Ingredients – for the filling
- 85g unsalted butter, softened
- 150g icing sugar
- 80g full fat cream cheese (I used light because it’s all we had, but I’m sure it would be better with full fat!)
- 100g vanilla marshallow fluff (this was another special delivery from my mum from America, but I have now since seen it in small quantities in Sainsbury’s)
Method
- Preheat the oven to 170° C and line two baking
trays with baking parchment (do not turn the oven on now as
instructed because you have to chill the batter in the fridge for 30
minutes later on in the recipe)
- Using a handheld electric whisk cream the butter and sugar together until lights and fluffy. Add the egg and mix in thoroughly, scraping down the sides of the bowl.
- In a jug, mix together the buttercream and vanilla by hand, then add it to the creamed mixture, mixing on a low speed. Sift in the flour, cocoa powder, bicarb and salt in two batches, mixing thoroughly after each addition until all the ingredients have come together. Add the red food colouring then increase the speed to medium-high and mix well to ensure the batter is an even red colour (you need gallons of red food colouring to make this go red!). Leave the batter in the fridge for 30 minutes to cool and set.
- Spoon the batter onto the prepared trays, making 8-10 mounds per tray, each 3-5 cms in diameter and 2-3 cms apart. Bake in the oven for 10-13 minutes or until springy then allow to cool completely before you assemble the pies.
- While the sponges are cooking make the filling. Using a handheld electric whisk mix together the butter and icing sugar on a low speed until combined. Add the cream cheese and mix, still on a low speed. Once all the ingredients are mixed, increase the speed to high and beat for approx 1 minute.
- Add the marshmallow fluff and beat the filling until light and fluffy. Place the filling in the fridge for about 30 minutes to firm up.
- When the cakes have cooled, spread about one tablespoon of filling on the flatside of one sponge and then stick another sponge flat-side down on top to make a sandwich. Repeat with the remaining sponges and filling.
So, most importantly how did they taste... here
is a whirlwind rundown
Chocolate Cake House Cake – yummy basic
chocolate cake which is SUPER fun to decorate, it’s really the equivalent of a
gingerbread house in cake form. You could go wild with the decorations if you
had the time and creative flair. I think this could be a great (if perhaps slightly
messy) activity to do with kids.
Clootie Dumpling – yum yum yum! Far
better than Christmas pudding in my opinion so I think it will be on our table
again in years to come. It is just a nice lighter, spicy, fruity alternative at
the end of heavy Christmas meal.
Cranberry and orange muffins – no soggy
bottom but plenty of muffin tops here. These are really fresh, almost healthy
tasting muffins which are great for breakfast or morning snack.
Drum
roll please...the final bake of the 52 week challenge... Red Velvet Whoopie Pies... well
I am a little bit underwhelmed really. They were a bit of a faff to make and
seem confused about whether they are cakes or biscuits which just means they
are quite heavy. I made eight big ones which might not have been the best idea,
maybe I should have tried more smaller ones? Oh well you can’t win them all,
just goes to show that 52 weeks of baking doesn’t mean you will LOVE everything
but I enjoyed giving them a go. Anyway, they still got a thumbs-up and a high
five from taste tester Ben so that’s a win.
You are
probably in need of a strong drink after reading that marathon post so there is
nothing left for me to say other than thank you for reading, I hope you have
enjoyed the bakes and maybe tried a few out for yourself. I have LOVE the
challenge and it feels great to have properly learnt a new skill over the past
year. I will definitely keep baking, I think I am slightly addicted but at
least it’s legal!
The
challenge has been so much fun that I have set myself another one for next year...
I will reveal all in a post tomorrow.
xx Linds xx
P.S Here is a photo of the Free Cakes for Kids cake for Brogan
 |
| Nuala, my assistant with the finished cake. |
No comments:
Post a Comment